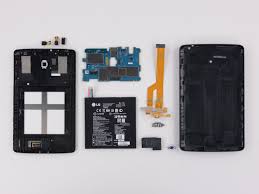
How To Repair A Broken Screen of LG G Pad?
A broken screen of a phone or tablet is not a new thing, every second person has broken the screen by mistake. When your LG G Pad screen gets broken, you don’t have to purchase a brand new device. You just need a trusted repair shop to replace the glass or you can do it by yourself.
If you are aware of the process, you can save the service cost that you might have to give at the repair shop. A tablet’s touch screen hardly costs around $50. In the case of LG G Pad 101 Screen Repair or LG G Pad 83 Screen Repair, the price of the screen will remain the same. If you purchase the screen online, you can get hefty discounts.
It's actually quite easy, and cheap, to replace the glass once you get the hang of it. Today we are going to share the step for Screen Replacement DIY for LG G Pad 101 and Lg G Pad 83.
As the basic
construction of most of the tablets is the same, so having knowledge of a few
devices can do the job.
The construction is loosely the same across devices and generally includes a back cover, motherboard-containing frame, LCD-containing chassis, LCD, front frame or bezel, and the touch-sensitive glass sandwich -- which is called a digitizer.
DIY To Replace Broken Screen of LG G Pads
Before embarking on the
journey of LG
G Pad 101 Repair and LG G pad 83
Repair you should look at the required tools, and keep them handy.
Tools required to repair LG G Pads
· Small screwdrivers of various size
· · A heat gun
· · Scissors
· · Double-sided tape
· · Canned air
· · Work gloves
· · Two bowls to keep screws from getting lost
· · Screen & digitizers
Replacement screens and digitizers can be obtained from sites like eBay, Amazon at a fair price.
Step 1: Open The Device
Remove the device's back
cover and pull the main battery. Now take a picture with your phone to remember
the connections.
Step 2: Remove the
Internal Parts
Loosen the cabling,
remote camera cable, remove other cables that are stuck. Pull gently.
These cables simply
slide out of any exposed sockets after clasps are released.
Step 3: Unscrew The
Motherboard
Unscrew all the screw
one by one, keep them aside in a bowl so that you don’t lose them.
Step 4: Heat Up The
Broken Screen
Now using the heat gun,
heat up the LCD glass. This may take a bit of time. Using the fine spatulas or
knife remove the screen. The screen may break further if you haven’t heated it
much.
Be patient while the
heat gun loosens the adhesive and is careful not to break the bezel or front
frame while removing the glass
Step 5: Clean Up old
adhesive stick to the front frame.
After removing the old
screen you will see, a thin double-sided tape sticks around the frame. Remove
the old tape. And clean it properly.
Step 6: Paste a fresh layer of double-sided tape.
After removing the old
tape, attach a good adhesive tape to areas of the bezel. I suggest
removing the old tape, as it might lose the stickiness, the new tape will hold
the screen much better.
.
Step 7: Paste the screen
on the place.
It’s time to put back
the things together as earlier. Paste the screen by gently pressing towards the
front frame. After ensuring that you have pasted it properly then move ahead.
Step 8: Assemble the
things.
Assemble time!
Reassemble the camera, motherboard, and attach all the cable in their initial
place. Take help from the picture you have taken at the time of disassembling
things.
After assembling turn on
your LG
g pad 83 repair and check the functioning of the new screen.
DIY’s are fun, but I
would never suggest it to a novice. Because a tiny mistake can ruin your entire
device. For perfect screen replacement, you should go for tablet repair
services at your native place or online. They will do the job precisely. All
the best to tech-savvy and DIY lovers!


This is my first time I visit here and I found so many interesting stuff in your blog especially it's discussion, thank you.how to remove back of iPhone
ReplyDelete